Loading
Showing posts with label tips and tricks. Show all posts

Tuesday, January 27, 2009

Tips & Tricks : How to restore Microsoft IE 7 original settings?

There are lots of choices available on Brower front now a days. These choices include Mozilla Firefox, Microsoft Internet Explorer, Opera, Google Chrome, Flock and list goes on.

But suppose you are quite happy with your windows setup and love IE very much. While you browsing happily, you start accumulating lots of add-ons, plugins and other ActiveX controls. These goodies are apart from from browser cache, history tracks and other resouces you accumulate while surfing the ubiquitous internet. All those accumulated artificats, start impacting Browser behavior. Like it will start storing unnecessry form fields, popping up non-required dialogues from add-ons, distorting HTML fonts and so on.

There is a trick to make your IE healthy again. And start living together happily ever after.

Open your IE. On Top Menu, select Tools -> Internet Options -> Advanced.


Then click on "Reset..." button. It will display following dialogue box.


It is pretty much self-explainatory. It disables toolbars and add-ons, deletes browser history along with unnecessary items, resets web browser settings.

After completion of restoring of MS IE 7 original settings, you would need to re-start the browser.

If necessary, you can uninstall old tool bars, add-ons as well as other ActiveX controls using Revo Uninstaller or CCleaner freewares.

This will revive IE 7 and speed up browsing.

Enjoy...

Tuesday, December 23, 2008

Tips & Tricks : How to enable web inspector in Safari browser?

Tips & Tricks : How to enable web inspector in Safari browser?

Internet Explorer and Firefox both has goodies to allow web designer, developer and users to look inside rendered html page, its session, cookies, DOM, scripts and css etc. IE uses Microsoft IE developer tool bar, Fiddler and other proprietary add-ons. While Firefox comes with Firebug and lots of other extensions which allow you to inspect internals of rendered html page.

While Safari is cool. It is fast and well integrated with (Mac) os. Slick looks and connection with iTunes. But what if you need to inspect your cookies, urls, DOM, scripts and all other things for your website. How can you do that with Safari? There are two options right now we have.

  1. Firebug lite

  2. This is basically a JavaScript file which can be injected into any web page to stimulate some of the firebug features in browsers. Firebug lite generates variables to perform its magic and not to affect or impact existing HTML elements. These variables are "firebug" and "pl".


  3. WebKit’s Web Inspector Drosera
  4. WebKit is an open source web browser engine. WebKit is also the name of the Mac OS X system framework version of the engine that's used by Safari, Dashboard, Mail, and many other OS X applications.

    Drosera is a JavaScript debugger for WebKit that can be used with any application that uses WebKit. Like the Web Inspector, over 90% of it is written in HTML, CSS and JavaScript.

Now I have made you curious mentioning about both of these tools. Let me share how to get these tools for your web development.

  • Enable Firebug Lite

  • If you prefer you can check in detail about Firebug lite here .

    In short you can use Firebug lite in three different ways.

    First you can add in line javascript to contain Firebug lite,
    second you can drag Firebug lite as a bookmarklet. On safari, I could not drag and drop the link to bookmark toolbar. But on IE I could.
    Third is to download it offline and install it.


  • WebKit’s Web Inspector Drosera

  • Provided you download, build and install Webkit as per instructions here.

    Either run following command from command window / terminal:


    defaults write com.apple.Safari WebKitDeveloperExtras -bool true

    Or

    Add an entry to WebKitPreferences file.


    <key>WebKitDeveloperExtras</key>
    <true>


    WebKitPreferences file is supposedly found at C:\Documents and Settings\Administrator\Application Data\Apple Computer\Safari\ on windows and at ~/Library/Preferences/com.apple.Safai.plist on Mac. Better to use search/finder utility to find the file.


  • Develop Menu on Safari

  • This one allows you to use Develop menu which has web inspector, Error console, Network timeline etc. It needs web kit be installed or pre-installed.


    • This is been tried on Safari 3.2
    • You can open safari, then go to Edit > Preferences > Advanced properties tab.
    • Safari Advanced Preferences
    • After you check "Show Develop Menu in Menu bar", develop menu will appear quickly on top side:
    • Safari Develop Menu
    • If you click on develop menu, it will look as below:
    • Safari Develop MenuEnabled
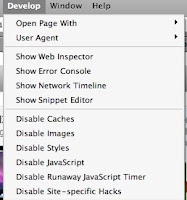
    • Finally here is the web inspector


Enjoy...

Wednesday, August 20, 2008

Tips & Tricks : How to list contents ? on Linux/Unix or On Windows

It always happens that we would like to see what is inside that folder or inside that archive. No matter what type of contents are there, it is necessary to get it through listing those directories and archives.

So here are some handy tips, I use for my daily work:

  • Directory listing on Linux and Windows

  • Ever wonder how to see all the subfolders under main parent folder. Here is the trick to list all files and folders recursively.

    • This is on Linux/Unix


    • ls -R -1

    • This is on Windows


    • dir /s /b

  • Listing contents of archive files


  • On Linux/Unix and Windows, lots of time, in day's work it happens that we come across JAR, TAR, GZ,BZIP, RAR etc archive formats and before opening those FTPed or SCPed or magically appeared archives we do like to see if those are right archives.

    So here are some tips on that:

    • Listing tar file contents


    • tar -tvf tararchive.tar

    • Listing tar.gz file contents


    • tar -ztvf gzippedtararchive.tar.gz

    • Listing the contents of a tar.bz2 archive


    • tar -jtvf file.tar.bz2

    • Listing the contents of a Java archive (JAR,WAR,EAR etc)


    • jar tvf jararchive.jar

    • Listing contents of ZIP Archive. Assuming unzip is been installed on the linux box.


    • unzip -l zippedarchive.zip

    • Listing contents of RAR archive. Assuming unrar is been installed on the linux box.


    • unrar l rararchive.rar

    • Listing contents of GZIP or GUNZIP or GZCAT or ZCAT archive. Assuming either of these commands are installed on Linux box.

      gzip -l gziparchive.gz

      gunzip -l gunziparchive.gz

      zcat -l zcatarchive.Z


Please let me know if you have any such tricks to share with our readers. Feel free to put it in comments.

Thanks...

Friday, May 2, 2008

Tips & Tricks : how to encrypt the clear text boot.properties manually in WebLogic Application Server?

This tip is useful for two purposes.

  1. First is to recover from invalid system password situation and

  2. second to encrypt the clear text boot.properties.


The trick is to execute File Realm Class from core weblogic.jar file.

  1. First Identify a user and/or the set of users who needs to recover an invalid system password or to encrypt the clear text boot.properties manually.

  2. Second Create a properties file with extension .src and Add all the users need to be defined within this file.

  3. Third execute the File Realm class.


Here is how it is done:


Comments are allowed within the file (preceded by the # sign), and for each user within the set a corresponding entry must be defined on its own new line within the file using the following format:

user.<username>=<cleartext_password>

An example follows:

# define the WebLogic system to have the clear text password WebLogic
user.weblogic=weblogic


  • The newly created fileRealm input definition file (.src) can reside anywhere on the local file system.

  • When the input definition file has been created, the location of SerializedSystemIni.dat must be determined before the FileRealm class is executed from the command line.

  • SerializedSystemIni.dat provides an input seed (or salt) to the hashing phase of the encryption process, and that a password hashed with a specific salt can be successfully compared only to another password hashed by the same exact salt.

  • Therefore, the SerializedSystemIni.dat file, localized at the domain level and present within the security/ directory, has an explicit relationship to the passwords it hashes for the file realm of a given domain. Since WLS can't maintain a file realm in which the set of hashed passwords present have been seeded by different SerializedSystemIni.dat files, you should never mix passwords hashed by different salt files within the same file realm.

  • Set system class path to include the “weblogic.jar” file from the lib directory of the WLS installation.
    <<bea_home>>\server\lib

  • Invoke the utility from the command line as follows:
    java weblogic.security.acl.internal.FileRealm \ <path_to_output_file>\<path_to_salt_file>

  • <path_to_output_file>-
    The path to the output file given by the first parameter should be identical to that of the input definition file, with the .src extension dropped for the output file.

    For example, if you had created the input definition file as mentioned in above steps in a folder:

    c:\temp\user.properties.src,

    You’d now need to define the output file at

    c:\temp\user.properties.


  • This accommodates the way the FileRealm class internally handles the location of the input definition file - it concludes its location by using the same path and name of the output file, yet it assumes the input file has the .src extension added to it.

  • <path_to_salt_file>-
    This contains a hash key (called salt) to encrypt clear text password. This
    Parameter defines the location of the SerializedSystemIni.dat file.

  • It is under folder
    <<bea_home>>\user_projects\domains\<<domain name>>\security

  • Upon execution, the FileRealm class will generate its hashed password outputs into the file defined by the first input parameter.

  • After completion of command execution, open output file in notepad.


    • To recover invalid system password Select encrypted Password
    • &copy it from that output files and paste that encrypted password to FileRealm.dat which is under following folder:
      <<bea_home>>\user_projects\domains\>>domain>>\
    • After completion of copy-paste and file save of FileRealm.properties file, start WLS server to test the password recently set for the <<domain>> user. If the password recovery was successful, the server will properly start and WLS will operate as expected.


    • To encrypt the clear textSelect encrypted Password & copy it from that output files and paste that encrypted password to boot.properties.


Enjoy...

Sunday, April 27, 2008

Tips & Tricks : Directly photoblog from Flickr to your blog

Discovered a cool trick on Flickr. It is to post a photo/video directly from Flickr to the blog.

Here is how you can do it:

First setup Flickr to Blogsite configuration as below:
  1. Login to your Flickr Account (obviously) :D)
  2. Choose "Your Account" from "You" menu.
  3. Click on "Extending Flickr".
  4. The "Extending Flickr" shows - your printing location, account links and "Your Blogs"
  5. Click "edit".
  6. On "Your Blog List" dialogue click on "add another blog".
  7. It presents a dialogue with drop down containing a list of all well known blog sites like blogger, typepad, wordpress, movable etc etc. Choose one - which is yours and press "Next"
  8. Depending on the blog website, it will present a page which can accept user id/password and blog URL. Enter all the information which is been asked and hit another "Next"
  9. Confirm your details and click on "All Done". This will give message "Your blog has been added to Flickr." and allow you to play with your blog posting template.
  10. As per your choice you may choose to customize the template. Positively, I have did it and would recommand to take a look. :D) Or you can choose to return to your blog list.
  11. You would be able to see your just configured blog in the blog list.

Now the Second step is to actually perform direct photoblog:

  1. Go back to your photstream.
  2. Choose a photo which you like to blog about.
  3. On top of the photo, you will see "blog this" link.
  4. Depending on the blogs in your configured blog list, it will present you the entire list and will allow you to choose one of the blog.
  5. Then a page with title Blog this photo, containing textbox & text area to compose your blog enter will be presented. Enter your photo related blog contents and click on "Post Entry".
  6. It will give you a success message "Your blog entry has been posted!"
  7. You can visit your blog either to check the post or to edit the blog post draft. Depending on your blog settings.

Enjoy...

Thursday, April 17, 2008

Portal Experimention with AJAX-Solutions For Professional Coding

A great review of almost 140+ AJAX, JavaScript and CSS toolsets for RIA Development. You can find those here "80+ AJAX-Solutions For Professional Coding" and "60 More AJAX- and Javascript Solutions For Professional Coding".

I am working on using randm sampling methodology and experiment some of these utilities on various portal servers and share my research finding.

It may take a while to update this ...so please be patient...and if you have already tried any of these utilities ...please do let me know through your comments. In advance, sincere thanks for your views and research sharing. !!!!

Tuesday, April 8, 2008

blog.ahfr.org : Making animated GIFs with GIMP and mplayer

I come across very good tutorial on
blog.ahfr.org - Making Animated GIFs With Free Software in Four Steps. It covers steps of creation of animated GIFs in crisp language. Also it shows how to use free open source tool. Excellent tutorial.

Thanks to Noha to allow me to showcase the work = HowTo. :D)

Thought these Downloads would be useful supplement

Sunday, March 23, 2008

Microsoft Windows Server 2008 Hyper-V

One of the hot utilization of virtualization is Server virtualization. It is also known as hardware virtualization. It is very important to the IT industry because of the high potential of several benefits. Server virtualization enables multiple operating systems to run on a single physical machine as virtual machines (VMs). With server virtualization, workloads of underutilized server machines can be consolidated onto a smaller number of fully utilized machines. These reduced numbers of physical machines could achieve reduced costs by less hardware, decrease in energy use, and management overhead. On top of it will create a more dynamic IT infrastructure. Being said so, Hyper-V is significant development.

Windows Server 2008 Hyper-V, the next-generation hypervisor-based server virtualization technology, allows to make the best use of server hardware investments by consolidating multiple server roles as separate virtual machines (VMs) running on a single physical machine. With Hyper-V, IT can efficiently run multiple different operating systems—Windows, Linux, and others—in parallel, on a single server, and fully leverage the power of x64 computing.

Microsoft has reached another key milestone in the development of Hyper-V, with a feature-complete version now available for download as a release candidate (RC).

You can download the update for Hyper-V RC here :Knowledge Base (KB) Articles:KB949219 Update for Windows Server 2008 x64 Edition (KB949219)

The release notes for Hyper-V can be found here http://www.microsoft.com/downloads/details.aspx?FamilyId=3ED582F0-F844-40BA-B692-230845AF1149&displaylang=en.

There is step by step how to document on how to install windows 2008 Hyper-V release candidate (http://www.microsoft.com/windowsserver2008/en/us/hyperv-install.aspx). Apart from this Microsoft has provided Step-by-Step Guide to Getting Started with Hyper-V here (http://www.microsoft.com/downloads/details.aspx?FamilyID=bcaa9707-0228-4860-b088-dd261ca0c80d&DisplayLang=en).


Once you install Windows 2008 Hyper-V and enable Hyper-V role, if you plan to install Ubuntu 7.10 (either server or desktop) on Windows Server 2008 Hyper-V, I would suggest to read Sriram Krishnan's blog http://www.sriramkrishnan.com/blog/2008/03/running-ubuntu-on-windows-server-2008.html. Sriram has discovered a bug around emulation of real mode instructions and the graphics instructions that ISOLinux uses to boot and has described a solution to patch .iso file in this blog.


You may ask the question about how this cool technology for hot usage in IT world works.I personally found couple of resourcs Keith Combs' Blahg : Windows Server 2008 Hyper-V 10 Minute Tour - Redux with Screencast, computerworld article "Windows Server 2008 Revealed: Hyper-V virtualization" by Jonathan Hassell, Ruben Spruijt blog on Hyper-V solution overview etc very helpful and quick to learn things on Hyper-V

Keith Comb's blog has Windows Server 2008 Hyper-V 10 Minute Tour - Redux (http://blogs.technet.com/keithcombs/archive/2008/02/16/windows-server-2008-hyper-v-10-minute-tour-redux.aspx) Windows streaming media screen cast mms://wm.microsoft.com/ms/inetpub/keithcombs/ws2008/WSvTour.wmv

Also Dec'20th,2007 issue of computerworld does a great job of explaining the things.

The article "Windows Server 2008 Revealed: Hyper-V virtualization" by Jonathan Hassell (http://www.computerworld.com/action/article.do?command=viewArticleBasic&taxonomyName=operating_systems&articleId=9053781&taxonomyId=89&intsrc=kc_feat) covers

"how it works?

To understand Hyper-V, consider its three main components: the hypervisor, the virtualization stack and the new virtualized I/O model. The Windows hypervisor basically acts to create the different "partitions" that each virtualized instance of code will run within. The virtualization stack and the I/O components provide interactivity with Windows itself and with the various partitions that are created.

All three of these components work in tandem. Using servers with processors equipped with Intel VT- or AMD-V-enabled technology, Hyper-V interacts with the hypervisor, which is a very small layer of software that is present directly on the processor. This software hooks into threads on the processor that the host operating system can use to efficiently manage multiple virtual machines, and multiple virtual operating systems, running on a single physical processor. "

Another good informative blog on Hyper - V solution overview Written by:Ruben Spruijt Publication Date:March 11, 2008 (http://www.brianmadden.com/content/article/Microsoft-Windows-Server-2008--Hyper-V-solution-overview ). It covers "an overview of the Windows Server 2008 Hyper-V solution".

Enjoy...


Saturday, March 22, 2008

vmware Workstation : Your host does not have synchronized TSCs. Please read VMware Knowledge Base article 2041

VMWare Workstation evaluation

While trying out vmware workstation trial/evaluation copy, come across warning messages. Here is what happened. Downloaded VMWare workstation from VMWare downloads section.

  • Hardware
The home PC has amd athlon X2 64 and Windows xp sp 3 with 250 gb hdd and 3 gb ram.

  • Installation
Installation of VMWare workstation is easy breezy .

  • Fedora core 8 for guest OS
Downloaded Fedora Core 8 to play with VMWare workstation.

  • Creation of virtual machine
On completion of successful download of Fedora Core 8 at c:\temp, started VMWare workstation.Using new => virtual machine have invoked virtual machine wizard selected custom option to choose other linux 2.6.x kernel. And allocated resources like virtual hard drive, RAM, etc.

  • Warning Message
When powered on fedora core 8, it give warning message


"Your host does not have synchronized TSCs. Please read VMware Knowledge Base article 2041".

Clicked on ok and let Fedora Core 8 power on.

  • Issue Resolution
To resolve the issue I have added following lines to config.ini which is existing in C:\Documents and Settings\All Users\Application Data\VMware\VMware workstation

processor0.use = TRUE
processor1.use = FALSE
host.noTSC = "TRUE"
ptsc.noTSC = "TRUE"
host.TSC.noForceSync = "TRUE"

  • Interesting findings:

While digging into the issue, I have come across some interesting resources. These resources are related to .VMX file which is generated by VMWare workstation and performance degradation issue for computers running windows xp sp2 on multiple processors with resolution fix pack from Microsoft.

Here are those resources for further reference on virtual machine file: